Introducing new pricing for Helpmonks
Discover Helpmonks' new pricing structure, featuring a flexible PRO plan, a FREE plan for smaller teams, and an exciting affiliate program. Experience unparalleled email management solutions today!
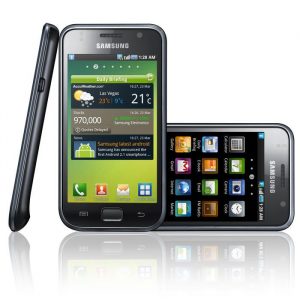
Read now Ok, so I did it. I went from my truly lovely iPhone (3G) to a Android phone. My choice is the Samsung Galaxy i9000 (some call it GT-9000). So, how is the experience so far?
Actually, I can say nothing else then just good thing about it. The Android OS feels just like…. natural. You realize quickly, that Google has put in a lot of efforts into this system. Actually, they put in a lot of efforts in their latest products (Chrome, Picasa, etc.). In any case, I could get everything running in short time.
If you have a Google (or Google Apps) account then synching and setting up the phone is a breeze. All you have to do is to enter your eMail address and password and your phone pulls all the eMail, Calendar and Contacts from Google. Nothing else to do there. I actually had a funny thing with Contact synching. That is, that one contact wouldn’t sync at all and I also received a lot of “sync has a problem right now” with the Contacts. In the end I removed the contact in question and entered it again. But otherwise, everything runs fine.
You can feel that Android was build for working with Google Apps. eMails come in almost as instantly as on any desktop app. GTalk is integrated also and you get notification going all over the place. One thing that Android has definitely gotten right, are the notification in general. They don’t only work for some applications, but work for about everything. This is especially useful if you are on Twitter (who isn’t? btw: follow me at @thenitai) and someone mentions you or is sending you a message. This works with Seesmic or Hootsuite and any other app. Very nice.
Another thing is the geo location functionality. Google Maps with direction just blows aways about everything you have seen before. Did you ever try to use Directions on the iPhone? The last time in London, I ended up in a total different place. Anyhow, all I’m saying is that Android is really a good system and if they continue like this, they will give everyone a run for their money (yes, Apple I mean you).
Not being a “game” guy, I did not play one game on it yet, but can imagine that the Galaxy screen just screams for it 🙂 Talking about the screen. WOW. This Super Alomed screen is just marvelous. The phone itself is bigger then the iPhone (3g and 4G) but just a little. Since it is lighter then the iPhone 4G you actually don’t feel a difference at all. Actually, you won’t even notice a big difference between the iPhone and the Samsung, until you start working with it and realize that Android is not just a “Linux” and “Geek” system, but a grown up operating system for the phone. And a fun one as well. Turn on “Live Wallpaper” and you know what I mean…
At the end, I recommend the phone wholeheartedly to everyone who is thinking of switching from the iPhone.
Below are some tips for connecting to MacOS X and setting up the phone with Swisscom.
Mounting the phone in MacOS X
The good thing is that you can simply hook up the phone by USB to the Mac and it starts charging the battery. Of course, there is no iTunes synching or alike, but if you need that you can get “The Missing Sync for Android” application. I haven’t used it but heard good things about it, especially since you can use it over Wi-FI and Bluetooth.
But if you want to simply mount the phone and the HSDC card (if any) then you have to go trough some setting. There are somehow “hidden”, so here they are:
1. Go to “Settings”, then to “About Phone” and click on “USB settings”. Since the default is set to Samsung Kies it will never connect to a Mac. So choose either “mass storage” or “Ask on connection” (my choice).
2. After you have set the above you need enable USB debugging (strange but true or else you can’t connect to the Mac). Go to “Settings” again and choose “Applications”. Then click on “Development” and enable “USB debugging”.
Once you have done the above two steps you can connect your phone per USB to the Mac. The phone and if any SDHC card installed will show up as hard disk drives.
Setup GPRS and MMS for Swisscom network
If you, like me, have not bought the phone from Swisscom directly you have to setup the phone manually to be able to connect to any Internet service on 3G. Swisscom offers a “setup your device” website which will send you a SMS and will automatically configure the phone, but unfortunately the Samsung Galaxy can not be configured this way. Thus we have to do some hand work here.
Go to “Settings”, click on “Wireless and network” and then on “Mobile networks”. Within click on “Access Point Names”. You will probably see a black screen. Thus we will have to add a APN now. Click on the menu key and “New APN” (do it once for GPRS and one time for MMS). Then simply enter all the required paramaters according to the list below:
For GPRS:
Name: Swisscom GPRS
APN: gprs.swisscom.ch
Proxy:
Port:
User name: gprs
Password: gprs
Server:
MMSC:
MMS-Proxy:
MMS-Port:
MCC: 228
MNC: 01
Authentication type:
APN-Typ: Internet + MMS
For GPRS:
Name: Swisscom MMS
APN: event.swisscom.ch
Proxy:
Port:
User name:
Password:
Server:
MMSC: http://mms.natel.ch:8079
MMS-Proxy: 192.168.210.2
MMS-Port: 8080
MCC: 228
MNC: 01
Authentication type:
APN-Typ: MMS
That’s it. Now you should be able to see the “3G” sign in the upper menu bar and will be able to connect to Twitter et all on your mobile network.
Hope this helps anyone. If you have questions or want to know something just leave a comment.

Discover Helpmonks' new pricing structure, featuring a flexible PRO plan, a FREE plan for smaller teams, and an exciting affiliate program. Experience unparalleled email management solutions today!
Read now
Dynamic email signatures increase brand visibility, build brand identity, and boost conversions. Learn how to create and update dynamic email signatures.
Read now
Looking for an email marketing automation software? This guide shows what to look for. We'll also review the best tools for your online marketing needs.
Read now
Using customer engagement solutions helps you keep your existing customer base and grow. Here are the top 10 customer engagement solutions for your business.
Read now
Empower your team and delight your customers.
